Sunday 6 January 2019

Defender 300tdi Lucas 10AS Alarm Immobiliser (Spider) Problems

We have a 1997 Landrover Defender 300tdi that has given immobiliser problems intermittently. I had initially fixed the fuel solenoid as we would occasionally just come to a stop in the middle of the road , often at the most inopportune time! We could still get stranded though when the immobilser would not mobilise.

I would get mobile again by using a length of wire from the +ve of the battery under the front passenger seat to the solenoid coil terminal to start the engine. The pain was I had to remove the rubber air pipe on the diesel turbo air inlet to access the solenoid terminals. Anyway this was at least a way of starting the Defender , I had to fix this problem.

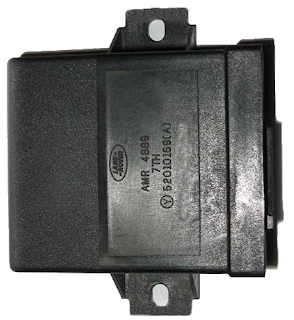
Looking on the forums for Defenders many problems with immobiliser could be traced to what was called a spider located in front of the battery under the front passenger seat. It's basically a metal box and metal lid pop riveted together with a plastic box inside that has a 12 way connector , see photo below. I took this plastic box and opened it , a PCB (printed circuit board) was inside with quite a few resistors , diodes , capacitors , an IC and two relays.

The so called Spider


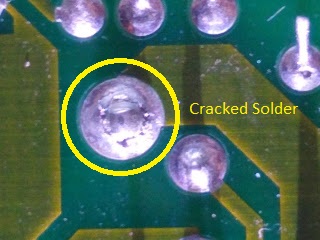
I inspected the board solder joints and the flow soldering was not very good , the solder was very dull not nice and shiny like it should be. The soldering on the relays was the worst and there appeared to be cracks round the relay main pins. I think the flow solder was not hot enough or the speed was too high through the flow solder machine when this board was manufactured. It did not wet the metal frame pins of the relays because they wicked away the heat causing poor solder connections. See the photos below showing two different cracks in the solder on two larger solder pads. Over the years the cracks grew due to temperature variations and vibrations and made the immobiliser very intermittent.


To fix this I re-soldered the whole board , every single connection , using a nice hot 350 DegC temperature controlled soldering iron. The solder joints were now nice and shiny and no cracks in the joints. I then cleaned the flux left on the board after the soldering by using IPA (isopropol alcohol). I tested the repair and the Defender started first time , before it wouldn't. This looks like the problem has been fixed. With the board like new it was refitted into its plastic box , cable plugged in and then fitted into the metal box. This metal box was then installed in its proper place under the passenger seat. Hope this helps someone with similar problems. Remember you are responsible for your own safety if attempting repairs of this nature. Job done!

Wednesday 30 May 2018

CNC 6040 Spindle Control

Note: This is only an on - off control there is no speed control due to limitations on the CNC control box , you set the speed using the potentiometer on the VFD (Variable Frequency Drive). To be able to control the spindle connected to the NowForever VFD Spindle drive , the following is required. The Parallel port pin used was P1 deduced from the YooCNC PCB silk-screen markings RLY - P1 , this pin controls the Relay on this board. The contacts of this relay were wired in to the terminals X1 and COM on the NowForever VFD , see photos below. The LinuxCNC settings were in Stepper Configuration Wizard -> Parallel Port Setup -> Outputs (PC to Mill) Pin 1: Spindle ON , this enables the control of the spindle. The Spindle on and off buttons will now work on the LinuxCNC Axis GUI.

The G Codes required for turning on the spindle are
M3 S1 

then delay 5 Seconds to allow spindle spin up
G4 P5.0 

and for turning spindle off.
M3 S0

For milling PCBs I added these g codes to the software FlatCAM Options Tab.

Prepend to G Code
M3 S1 
G4 P5.0

and Append to G Code
M3 S0

This then means when the G Code is generated from my PCB design at the beginning of the job the spindle will spin up wait 5.0 Seconds start milling and finally will stop the Spindle at the end of the job. This hopefully will reduce the wear on the spindle by only having it on when it is doing some milling.


Thursday 11 January 2018

BT Infinity Finally!

I have finally received super-fast broadband and it was enabled on Wednesday morning around 10am. I never noticed till a day later when I looked at my MRTG speed graphs and noticed the upload had risen from 1Mbps to 13Mbps!!! The download speed stayed at the usual just below 15Mbps but this is because the MRTG graphing only uses the last valid number when in fact the reading actually goes off-scale. I re-tuned the Download speed graph value to 60Mbps and it looks sensible now.

So my surmising what the AIO pavement spray painting meant ie signifying the installation of a all-in-one FTTC was correct. This post may also give someone whose internet comes from a far away cabinet the comfort that they may eventually get a cabinet closer to their home like in my case , I was originally connected to a cabinet ~1.5km away then moved to a new cabinet that is only 600m away.


Below shows the now stablised modem negotiated speeds , you can see a little step increase in downstream speed about midway on the graph and this may be down to a period of line speed training.


I have also been graphing actual measured download/upload speeds to various servers around the country , chosen at random every fifteen minutes or so. On the graph below you can see a baseline roughly between 30Mbps and 35Mbps for download speed , the upload speed is around 8Mbps most of the time.


I have also noticed the gradual increase in Download speeds , this seems to be done in steps , as seen in the graph I recorded.

Wednesday 18 October 2017

File resolv.conf changed on reboot

The file /etc/resolv.conf was being reset and losing the correct nameserver on my Raspberry Pi after a reboot. The unfriendly way of fixing this was to set the immutable flag of the file using :-
sudo chattr -i /etc/resolv.conf 
It worked but I know this isn't the correct way to do it , but hey-ho life's too short....

Tuesday 26 September 2017

Broken Ubuntu Mate Desktop

I had Ubuntu 16.04 LTS installed as a guest on a Windows 10 OS. The VM was shutdown uncleanly and after that its Mate Desktop wouldn't run properly. I re-installed the MATE Desktop using the following command.
apt-get install ubuntu-mate-desktop --reinstall 
After the re-install it worked fine with no problems. I'll remember to shutdown the VM properly next time.

Friday 4 August 2017

Virtualbox USB Problems

Using a PC running Ubuntu with Virtualbox using Windows 10 as the guest I found I could not add usb devices using the add new usb filter. After a bit of searching I found information about the issue here.
I had to run the following command to get it to work , remember to log out and log back in after running the command.
sudo adduser $USER vboxusers
After that the add USB devices filter worked fine.

Friday 30 June 2017

iAQ-CORE_C I²C Problems

Problems with the iAQ-CORE-C Indoor Air Quality Sensor Module. I built the module onto a breadboard pcb and while testing I found that it would not work. I couldn't detect the device on the I²C bus of the Raspberry Pi I was using. Although I could use other devices on the bus without a problem , I found a lot of forums with entries about clock stretching causing problems for the Broadcom SoC I²C bus. I even tested it on an Arduino and no data from the device was detected. After a long time checking and testing the breadboard I came across an error in my wiring that turned out to be the problem. The wire for the SDA Pin 4 was connected to NC Pin 1 on its way off the board to the Raspberry Pi. There is no mention in the manufacturers data sheet not to connect to this pin it even says not connected. I spent a fair amount of time debugging this fault and eventually got it working

Defender 300tdi Lucas 10AS Alarm Immobiliser (Spider) Problems

We have a 1997 Landrover Defender 300tdi that has given immobiliser problems intermittently. I had initially fixed the fuel solenoid as we w...