I would get mobile again by using a length of wire from the +ve of the battery under the front passenger seat to the solenoid coil terminal to start the engine. The pain was I had to remove the rubber air pipe on the diesel turbo air inlet to access the solenoid terminals. Anyway this was at least a way of starting the Defender , I had to fix this problem.
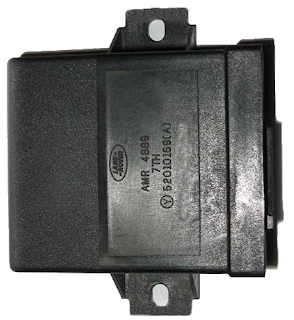
Looking on the forums for Defenders many problems with immobiliser could be traced to what was called a spider located in front of the battery under the front passenger seat. It's basically a metal box and metal lid pop riveted together with a plastic box inside that has a 12 way connector , see photo below. I took this plastic box and opened it , a PCB (printed circuit board) was inside with quite a few resistors , diodes , capacitors , an IC and two relays.
 |
| The so called Spider |
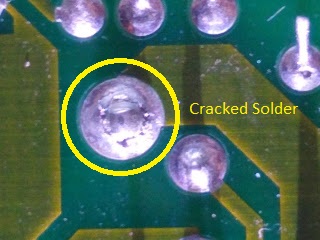
I inspected the board solder joints and the flow soldering was not very good , the solder was very dull not nice and shiny like it should be. The soldering on the relays was the worst and there appeared to be cracks round the relay main pins. I think the flow solder was not hot enough or the speed was too high through the flow solder machine when this board was manufactured. It did not wet the metal frame pins of the relays because they wicked away the heat causing poor solder connections. See the photos below showing two different cracks in the solder on two larger solder pads. Over the years the cracks grew due to temperature variations and vibrations and made the immobiliser very intermittent.
To fix this I re-soldered the whole board , every single connection , using a nice hot 350 DegC temperature controlled soldering iron. The solder joints were now nice and shiny and no cracks in the joints. I then cleaned the flux left on the board after the soldering by using IPA (isopropol alcohol). I tested the repair and the Defender started first time , before it wouldn't. This looks like the problem has been fixed. With the board like new it was refitted into its plastic box , cable plugged in and then fitted into the metal box. This metal box was then installed in its proper place under the passenger seat. Hope this helps someone with similar problems. Remember you are responsible for your own safety if attempting repairs of this nature. Job done!


No comments:
Post a Comment